Keurig Leaking Water From the Bottom: Find the Source First

Water under a Keurig is usually one of four things: an overfilled or badly seated reservoir, a split reservoir, a failed tank valve seal, or condensation from the exit needle area. Dry everything, put a paper towel underneath and run one brew - where the towel wets first tells you which. Only a split tank or a failed seal needs a part.
Causes, most likely first
Work down this list in order. The first two cost nothing to check.
- Reservoir overfilled past the MAX line - water backs out of the vent as the machine heats
- Reservoir not seated squarely, so the outlet valve is not fully engaged
- Split or crazed reservoir - usually a hairline crack near the base
- Tank outlet seal perished, which leaks only while the pump is drawing
- Condensation running off the drip tray area, which is not a leak at all
The fix, step by step
-
Dry everything
Take the reservoir off, dry the machine, the tank and the counter completely. You cannot diagnose a leak into a puddle that is already there.
-
Lay a paper towel
Put a full sheet under the machine, flat, so you can see exactly where the first wet spot appears.
-
Brew once and watch
Run a single water-only brew. Watch the towel rather than the machine. Note where it darkens first and whether it happens while the pump runs or after.
-
Wet before you brew?
If the towel wets with the machine idle, it is gravity through a split tank or a failed seal. Fill the tank and stand it on a dry towel off the machine for ten minutes - if the towel wets, the tank is cracked.
-
Wet only while pumping?
The tank is sound and the leak is at the outlet seal or a hose joint. Reseat the reservoir firmly and try again before ordering anything.
-
Wet at the front only?
Check the drip tray is not simply full. This is the most common false alarm of the four.
Water under a Keurig looks like one problem and is really four, and three of them do not need a part. The difference between them takes two minutes to establish and saves buying a reservoir you did not need.
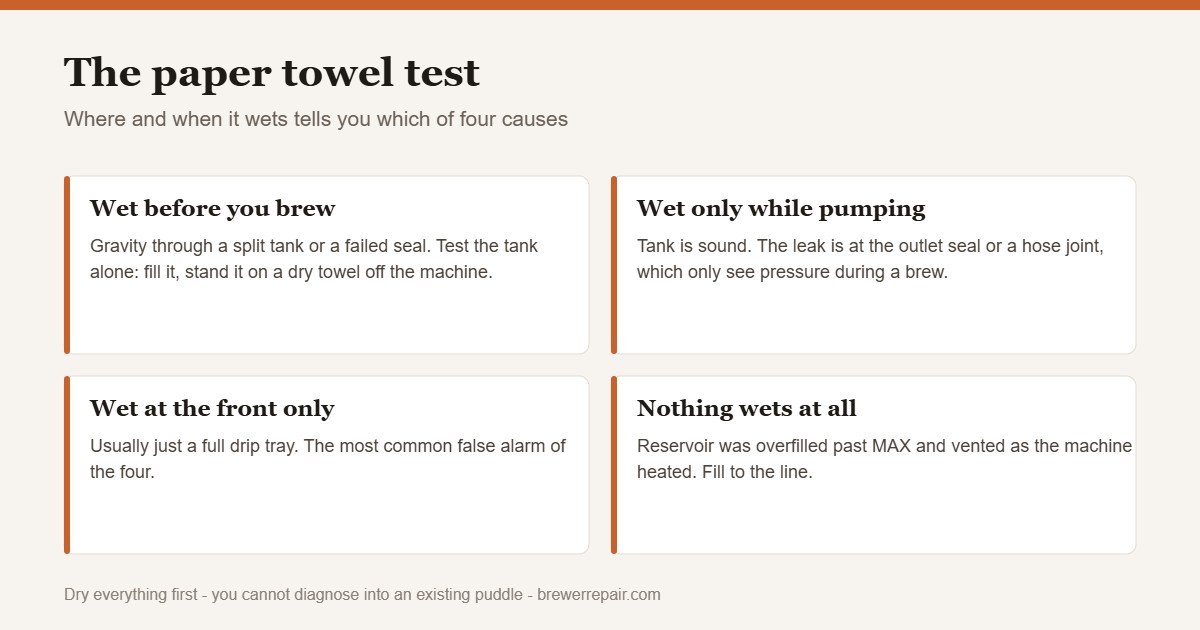
Dry everything first
This is not optional and it is the step people skip. You cannot tell where water is coming from when there is already a puddle. Take the reservoir off, dry the machine, dry the tank, dry the counter.
The paper towel test
Lay a full sheet of paper towel flat under the machine and run a single water-only brew. Watch the towel rather than the machine. Two things matter: where it darkens first, and when.
Wet before you even brew means gravity is doing it – a split tank or a failed seal that leaks whenever there is water sitting above it. Wet only while the pump runs means the tank is sound and the leak is downstream at a joint that only sees pressure during a brew. Wet at the front is usually a full drip tray rather than a leak at all.
Testing the tank on its own
If you suspect the reservoir, take it off the machine entirely. Fill it, stand it on a dry towel on the counter, and leave it ten minutes. A cracked tank will wet the towel; a sound one will not. Cracks are usually hairline and near the base where the plastic flexes when you lift it, so they are easy to miss by eye.
Reseat before you buy
A reservoir that is not sitting squarely does not fully engage its outlet valve, and the result looks exactly like a perished seal. Lift the tank off and put it back deliberately, pressing down until it stops. Run the test again. This resolves a meaningful share of cases at no cost.
Do not glue a cracked tank
It is tempting and it does not hold. The tank is food-contact plastic that flexes every time you carry it to the sink, and a glued crack reopens – usually when the tank is full and on the counter rather than in the sink. Replacement tanks are cheap.
The part, if you need it
If the test points at the tank, matching a replacement reservoir to your model covers which tank fits which Keurig, because they are not interchangeable across the range.
If it is not leaking but not brewing
Different symptoms, different guides: a Keurig that will not pump and one that brews short both start elsewhere. If the machine is flashing at you, Keurig’s own fix sequence is the place to start.
If you need the part
Check the fitment chart against your model number before ordering — sizes that look identical often are not.

The part you need
Keurig Water Reservoir Replacement: Which Tank Fits
Paid link. We earn a commission if you buy — the guides stay free.
Questions people ask about this fix
Why is my Keurig leaking water from the bottom?
Four usual causes: the reservoir is overfilled and venting as the machine heats, the tank is not seated squarely, the tank itself is cracked, or the outlet seal has perished. The paper towel test separates them in about two minutes.
How do I tell if my Keurig reservoir is cracked?
Take it off the machine, fill it, and stand it on a dry towel on the counter for ten minutes. If the towel wets, the tank is split. If it stays dry, the tank is fine and the leak is elsewhere.
My Keurig only leaks when it is brewing. What does that mean?
The tank is sound. A leak that appears only while the pump is running is at the tank outlet seal or a hose connection downstream, because those only see pressure during a brew. Reseat the reservoir firmly first - a badly seated tank leaks exactly like a failed seal.
Can I fix a cracked Keurig reservoir?
Not reliably. Glues and epoxies on a food-contact water tank that flexes every time you lift it tend to fail again, and often at a worse moment. Replacement tanks are inexpensive enough that repair is not worth the attempt.
Is water in the drip tray a leak?
No. The drip tray is designed to collect the residual water that comes out of the exit needle after a brew. If the tray is full and overflowing onto the counter, empty it - that is the intended behaviour, not a fault.
Other Keurig problems
Keurig Coffee Tastes Burnt or Bitter: What Causes It
Burnt and bitter are different complaints with different causes, and the plastic in a Keurig holds onto old coffee oil in a way people underestimate.
Clogged Keurig: Needle, Water Line or Scale
Three different blockages produce the same symptom. Which one you have decides whether the fix is two minutes with a paper clip or a full descale.
Keurig Will Not Turn On: Four Free Checks First
Lights but no brew is a different fault from no lights at all. Four checks that cost nothing, and the honest point where a Keurig stops being worth repairing.